I often get questions about the gear I use for flying, and about the gear I use for recording video and audio in the cockpit. I try to answer all of these questions in this post. I will start with an overview of the contents of my flight bag. I will give comments on each item as I see fit, in order to provide some background information supporting my choices, and to make it easier for you to see if a similar item would make sense for you. Then I will cover the settings used on my main media recording devices. Finally, I will provide a few tips and tricks about editing flying videos.
So what is in the bag?
My flight bag is an old North Face laptop bag, I don’t even know its type anymore (as it is not in production anymore for a long time already). I did not manage to find anything better which would fit all the stuff that I personally need in the plane, even though I must have checked out at least a hundred flight bags online. It is showing heavy signs of wear and tear already, but I think I will be using it until it really breaks.
By 2024 my old, trusty, but very cramped North Face laptop bag got so worn, that I had to replace it, and after checking out what felt like hundreds of flight bags online, I bought a Dimatex COCKPIT bag (in full black). It has everything a flight bag needs, but it is significantly heavier than the laptop bag was for the weight and balance sheet (and my shoulder). Other than that, it is a very nice piece of aviator kit.
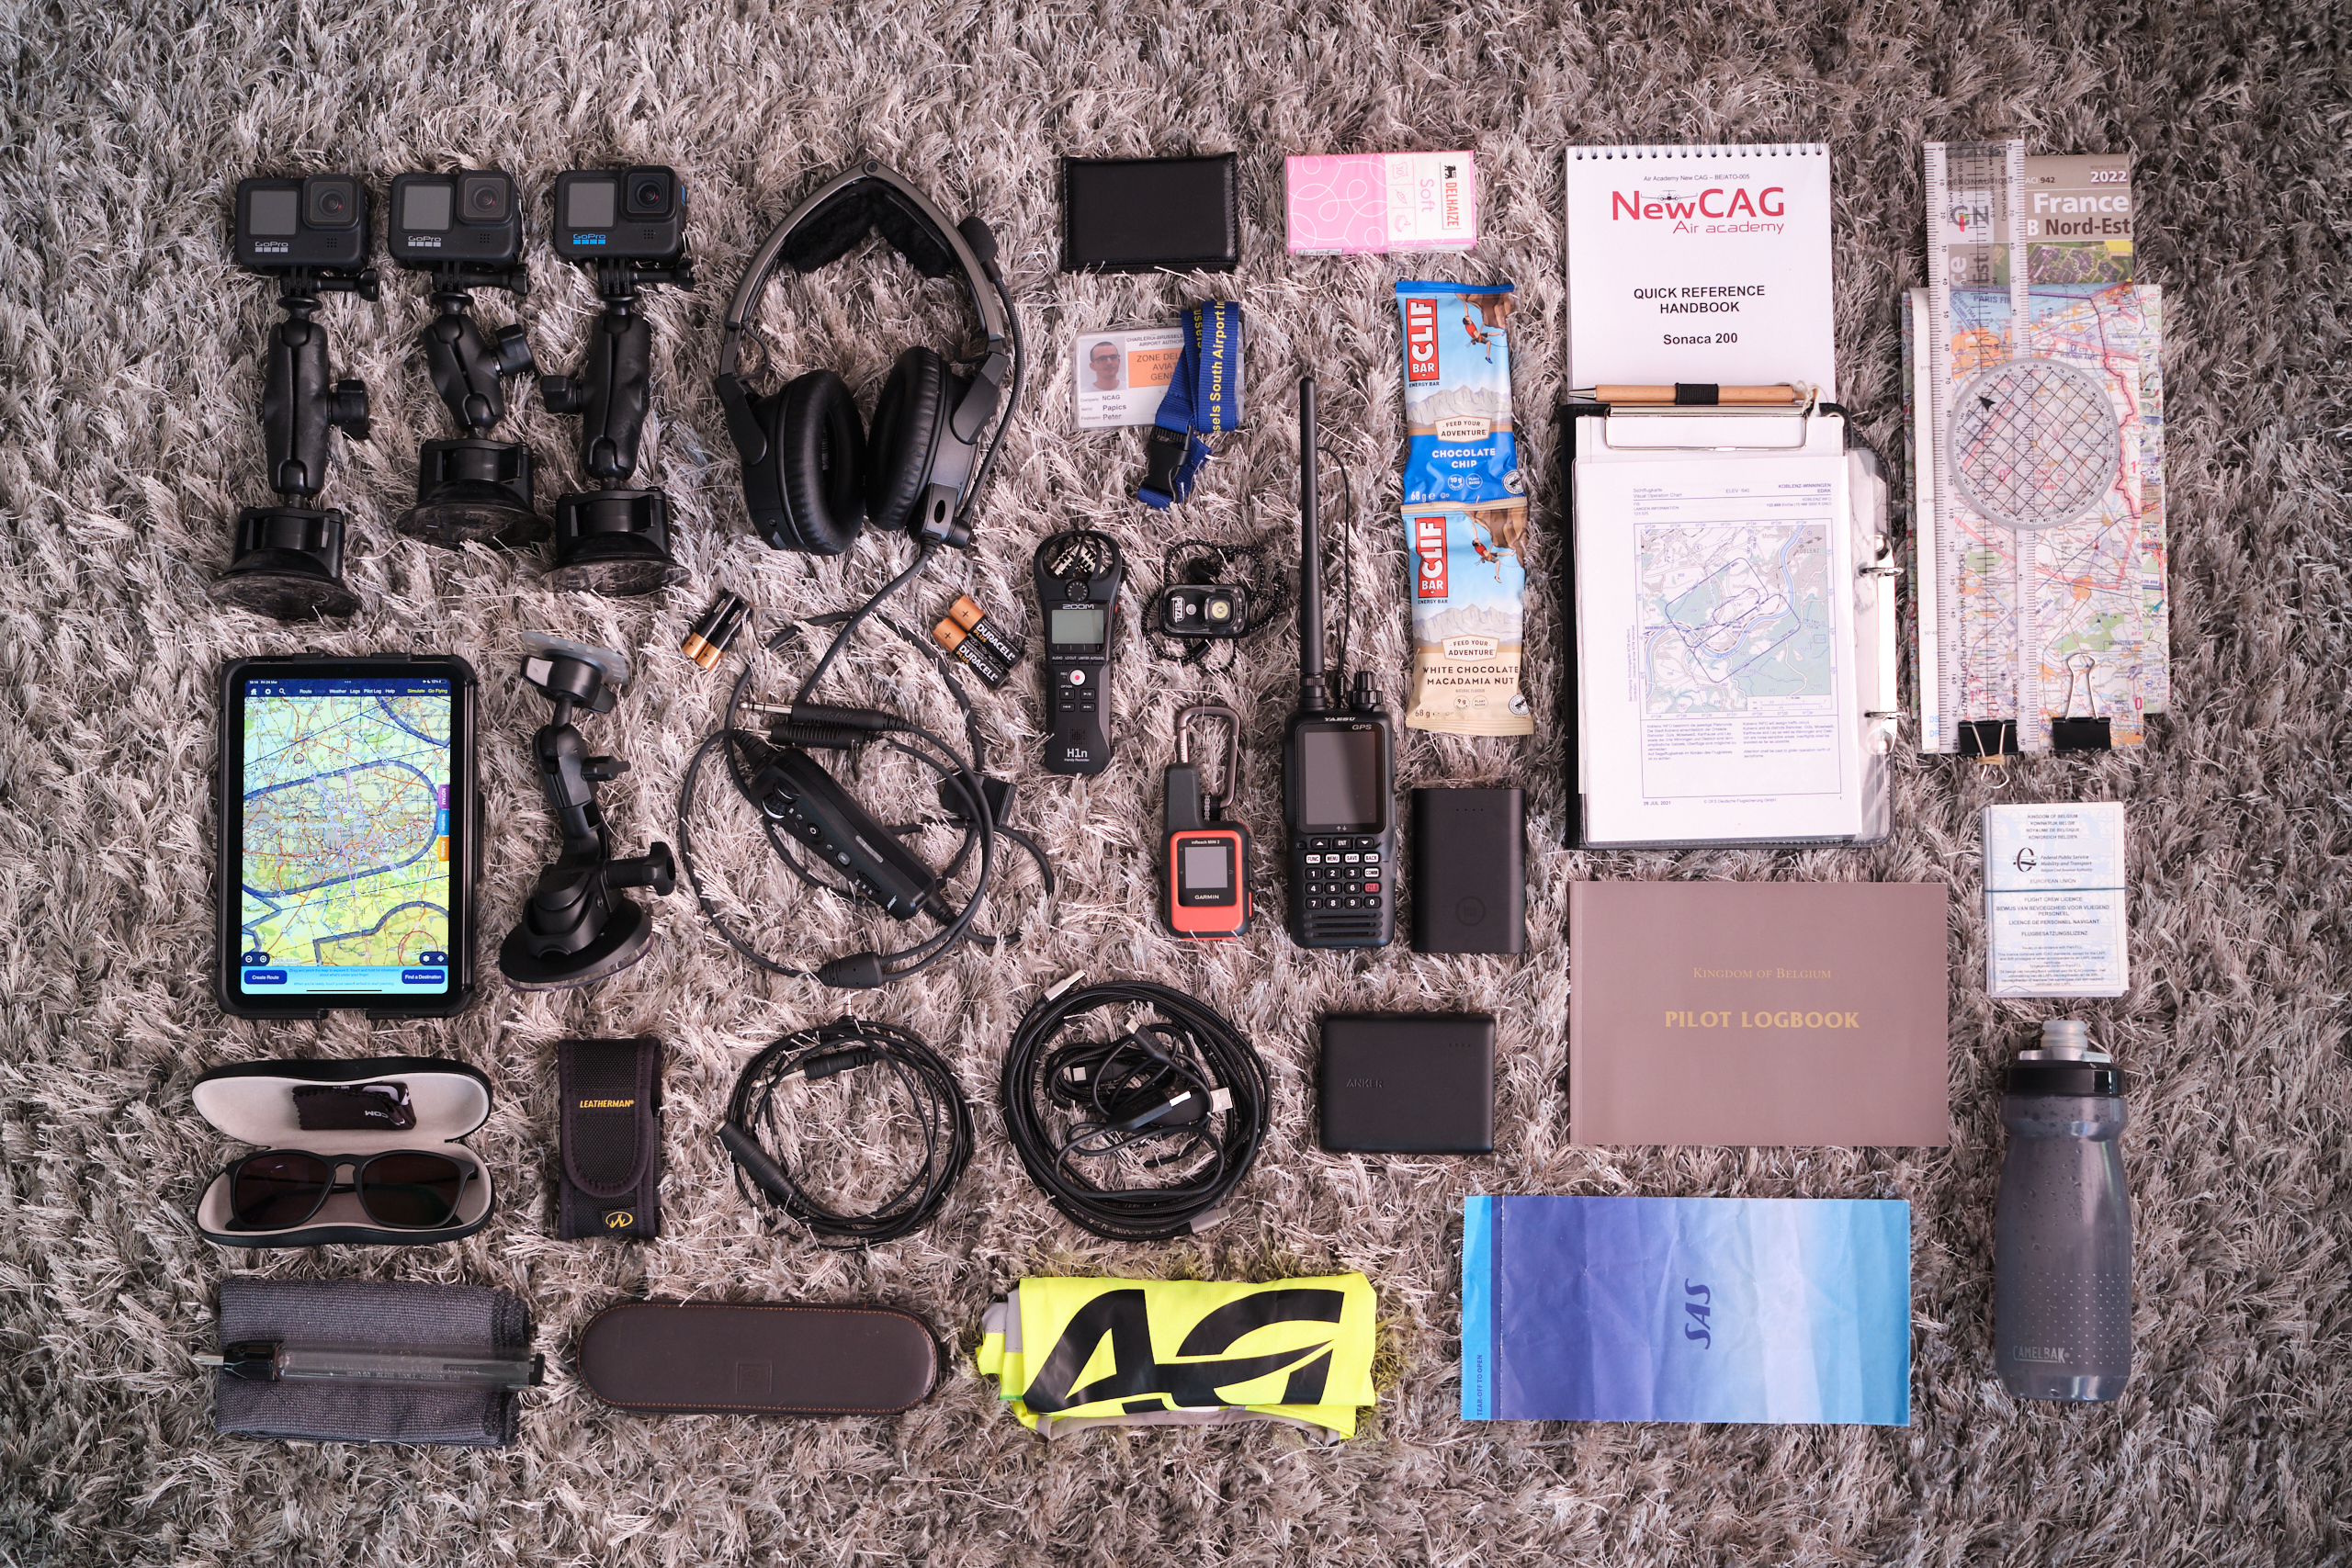
Items in my flight bag:
- Bose A20 aviation headset (with Bluetooth). It is on the expensive side, but if you want to invest into something during your flight training, invest into a good headset. I started with a David Clark which was third the price of the Bose, but the active noise cancelling makes a huge difference in audio quality and ATC readability. It is also comfortable to wear, and the Bluetooth is handy to connect my iPad (for audio alerts from SkyDemon) or my backup radio to it. It needs two AA batteries for the noise cancelling and the Bluetooth to work.
- Nflightcam Digital Audio Input Recording Cable (Fixed Wing). This is a line splitter, that you can plug between the headset cable and the intercom jack, providing a line in input for an external audio recording device, making it possible to record all intercom (and ATC) audio with an external recorder. This is clearly the best solution for good quality audio recording. I always put it into the co-pilot side intercom jack, so if the cable breaks somehow, I – the pilot – don’t loose audio. So far I have never had issues with it.
- Zoom H1n digital audio recorder. This is what I use to record the audio via the line in input coming from the line splitter cable. It runs on two AAA batteries (or from an external power bank, although I found this not to be very trustworthy), and I have a SanDisk MicroSDXC 32GB card in it, which is enough for more than 20 hours of audio on the highest audio quality levels. It provides much better quality and more control than recording intercom audio directly in one of the GoPro cameras using the required GoPro accessory. I tested this, the difference is highly significant. When not in use, it fits the case of my headset along with the line splitter, so I can keep all audio recording tools in one place.
- Backup batteries. A pair of AA (for the headset) and AAA (for the audio recorder) batteries.
- Apple iPad Mini 6 64GB Wifi + 5G. I use this tablet primarily to run SkyDemon and to store the plane AFM and instrument manuals on it. It is the perfect size for a smaller cockpit. Make sure that if you buy an iPad for navigation, you need the 5G version, as the Wifi only versions don’t have GPS built into them… I use the built in screen recording feature of iOS to record videos of SkyDemon as it is in the cockpit during navigation, and use these as overlays in my videos. Talking of apps, I also use myE6B for any kind of calculation that you would do with a flight computer, and for consulting the weather I like AeroWeather and meteoblue. I also use FlyLog.io as a digital logbook parallel with the paper one.
- FlyBoys PIVOT T21A case and PIVOT Low Profile Single Suction Cup Mount. This is the case and the mount of my iPad, professional (commercial and fighter) pilots are using this brand, and from my research I found this to be the most solid and practical solution. It is quite expensive, especially since you can only order directly from the USA, but it is very much worth it. The only thing I don’t like is that it is pretty difficult to open the iPad case when it is closed, but of course you only do that once per flight, and at other times the closed case provides heavy-duty protection, so you could literally throw it into your flight bag without care. I have never had issues with the iPad overheating in it during flight.
- 3 GoPro cameras (two GoPro HERO 9 Blacks and one GoPro HERO 11 Black, but honestly anything not older than a GoPro 7 will do, as that was the point where HyperSmooth stabilisation was introduced). The front facing screen that debuted on the GoPro HERO 9 makes framing some shots easier, but the most precise method is still using the GoPro Quik app on your smartphone. Each camera has a ULANZI G9-2 battery door (which makes it possible to connect external power to the cameras without removing or opening the standard battery door), and a SanDisk MicroSDXC Extreme 256GB memory card – although for longer flights (beyond 4 hours of continuous recording) I might need bigger cards or more of them. I use external power banks to power the devices, but I also leave the GoPro batteries in, so if any of the cables disconnects, I don’t run into trouble, plus this way I can just take a camera with me and record other things without being connected to a power bank. Make sure to format your memory card every time you want to delete recorded media, it is better for the memory cards, and it will help avoiding corrupted files (and it is recommended by GoPro for this very reason).
- 3 RAM Mounts for the GoPro cameras. You need three components to mount a GoPro: a suction cup mount (RAP-B-224-1U), a middle arm (RAP-B-201U-A) and a GoPro adapter (RAP-B-202U-GOP1). Sometimes you can get these in one pack, sometimes in pieces from Amazon… This is an excellent mounting solution, RAM Mounts is the top brand in this category. It is a much better system than the suction cup mount of GoPro itself (which I used in the beginning for quite a long time too).
- 2
BlueBuilt Powerbank 10.000 mAhAnker PowerCore Powerbank 20.000 mAh external batteries and 4 USB-C cables. The brand does not really matter as long as it is something proper (no name Chinese units might lack a power control chip, and the last thing you want is a battery fire in the cockpit). This capacity is enough to run all GoPro cameras and the iPad for more than a full day of flying. Luckily all of these have a USB-C port, so I can mix and match cables. I have one long cable to reach the camera behind me, for the rest even shorter cables work. Make sure to fully charge all your power-banks before flying. I store the cables in a no name felt case inside my flight bag. - Petzl BINDI headlamp. It is probably the smallest and lightest headlamp that can shine with both red and white light, which is a must for Night VFR flying. It has a rechargeable battery and a USB-C port, so it is perfect. Thanks to it being super light and having a thin head strap, it also fits perfectly under a headset.
- Yaesu FTA-850L portable airband transceiver. It is a backup VHF radio, which is also equipped with GPS and can receive NAV frequencies too (so you can track VORs with it). It has a rechargeable battery and can connect to my headset via Bluetooth. It gives me a peace of mind to know that even if the radio in the plane dies, I have a backup. You can have a less feature-packed model for half the price too. Note: in Belgium you need to register this with the BIPT on top of having your radio licence to operate it. Check your local regulations elsewhere. You could disturb aviation frequencies with it, so don’t go and buy one just for fun without knowing what you are doing.
- Garmin InReach Mini 2. This is GPS tracker and emergency messenger device which can communicate using the Iridium satellite network. It is total overkill for flying over the more populated areas of Europe, but if you fly over more desolate areas, or simply want your loved ones to always see where you are (giving them a piece of mind), even when you have no mobile connection, then it is a very useful gadget to have. Plus an extra way of contacting emergency services should something go very wrong is never a bad idea. Note: for the actual satellite communication functionality you need a monthly/annual service subscription. It has a crazy long battery life, which is pretty awesome, so it can be nice for recording very long hikes or adventures outside the cockpit too.
- High-visibility vest. On many airports you have to wear a high-visibility vest when walking airside. It might not be fashionable, but safety first.
- Design 4 Pilots Profi kneeboard. Even though I fly with an iPad, I would never fly without a kneeboard. I like my iPad on a mount, and I like to have a pen and paper for writing notes down, and also to put my paper airport charts and notes (light signals, etc.) inside. I have a pen attached to the kneeboard with a piece of rope, so the pen cannot fall down to the floor – out of reach – in flight even if it falls out of my hand in turbulence.
- QRH. The quick reference handbook of the plane I am flying with, containing normal and abnormal procedures and checklists.
- Paper VFR charts. In some countries it is a legal requirement, but it is also just common sense to have paper charts for backup (even with multiple SkyDemon equipped devices on board sometimes).
- ANZP-1 Plotter with Rotating Protractor. I don’t think I will ever need this in flight anymore, but I have it as it takes no space, should I ever want to properly plan a diversion on a paper map, because all my 4 GPS equipped devices have died… When I was still doing my PPL I also had a CRP-1 Flight Computer in the bag, but I have an app on my phone that calculates everything 100 times faster than that. I did cut it a bit shorter so it fits nicely…
- ID, Credit cards, Pilot licence, Medical licence, Radio licence (and an extra licence for my handheld radio), Pilot logbook, Charleroi airport badge. Not much to explain about these.
- Leatherman Rebar Multi-tool. Should there be a loose screw that you need to tighten, or you need a knife for making a sandwich, this has it all. I am sure I would survive without it, but it is also a bit cool to have. I have definitely used it around the house already, but not around the plane.
- Collection of pens, colour pencils (for navigation planning), a pencil sharpener, and an eraser. Except for the backup pen, I have not used any of these since getting my PPL (but I used them all the time for navigation planning on the paper maps before that).
- Fuel Tester. Most planes will have a fuel tester on board somewhere, but it happened already once or twice that it was not present, so I had to use my own. Always good to have a backup, as testing the fuel is important during the pre-flight checks.
- Backup pair of (sun)glasses and optics cleaning cloth. I need prescription glasses (both my eyes are -1.25), so it is a legal requirement for me to fly with an extra pair of glasses at all times. The cleaning cloth is also handy for keeping the GoPro lenses spotless.
- A pack of paper tissues. They come in handy also when checking the oil level, if no paper towels are available. Plus I have some allergies…
- Microfibre cloth. The ones at the airport are always dirty, so – very recently – I started carrying and using my own to make sure that the canopy is always clean for the video recordings (and for my visibility).
- Sickness bag. Because even an experienced passenger might get sick in bad turbulence or from vertigo. Just take one or two on your next commercial flight from the seat in front of you.
- An energy bar and a bottle of water. Especially during warm flights, a backup piece of food and some liquids are simply a safety item in my mind.
How to set up your audio and video recording in the cockpit?
Cockpit organisation is an important skill, and when you add extra items to your setup, it means that every pre-flight will take longer, so don’t expect that you will get ready to fly as fast as you did before. Allocate the required amount of time so you don’t have to rush. I plan a good 45 minutes of time from arriving to a cold and dark airplane to engine start, meaning that I typically arrive at the plane 1 hour before my planned take-off time. (When I flew with only one camera and an audio recorder during my PPL training, the setup took less time of course.)
To make sure that I don’t miss anything from the setup, I have added extra items to my QRH at the end of the before start checklist to control that all my devices are running and recording (3 GoPro cameras, the audio recorder, and the screen recording on the iPad). From that moment I pay no attention to these devices until I have stopped the engine at my destination. This way no extra attention is required from me towards the devices during flight. As a result all devices are continuously recording from before engine start until the end of the flight, which makes editing the footage also easier, as you don’t have to figure out when one camera was running, etc. The only drawback is that you will record a lot of quiet time, when nothing is happening, so you will need bigger memory cards and larger power banks in order to be able to do this on longer flights too. My current setup is fine until almost 5 hours, which is beyond the amount of flying that I am willing to do in a single day anyway, so I don’t expect problems in the near future.
My cockpit setup flow is the following. The audio splitter cable goes into the co-pilot side intercom port, and the (long) cable coming out of the splitter goes into the line-in port of the Zoom H1n audio recorder. I store this recorder in one of the side pockets of the cockpit, where the screen of the recorder is always visible (so I can always quickly check if the audio levels are fine). Three GoPro cameras are placed in the cockpit: one typically on the left side of the canopy providing a wing view to the left (when expecting right hand circuits I might move this to the right side, so on downwind it can provide a view towards the runway), one on the right front side of the canopy pointed inside at the pilot and the passenger, and one just behind and above my right shoulder hanging down from the canopy, pointing forward, showing the view outside and the instrument panel. The iPad is mounted floating above and in front of the left edge of the dashboard (hanging from the inside of the left front canopy), basically blocking no outside view, and still providing access to the engine starter, the magneto switch, and the master switches behind it. The two power-banks are placed into the two side pockets, the left one to provide power to the iPad and the wing-view GoPro, and the right one to provide power to the front facing and inside facing GoPro cameras. Long cables (running to the front facing GoPro and the audio cable between the splitter and the audio recorder) are routed around the side of the seats and behind the seats, completely out of the way.
All of this can be set up even before any of the pre-flight is done, except for the front facing GoPro, as with that installed the canopy cannot be opened in the Sonaca 200 anymore (in the Diamond DA 40 this will not be an issue anymore). This has an important consequence that you need to always remind yourself, or your co-pilot, that in case of an emergency that camera needs to be removed (it is a 2 second job with the suction cup) before the canopy can be opened. Aiming the wing-view camera and the inside facing camera is easy using the rear and front facing displays, but to aim the front facing camera I use the GoPro Quik app on my iPhone, which can connect to the GoPro in 10 seconds and show what it sees in real time on the phone itself. This is needed because when the GoPro is installed above and behind my shoulder, it is impossible to properly see any of its screens. Don’t forget to close the Quik app when finished. (In the Diamond DA 40 this will also not be an issue anymore, as the front view will be possible to be set from one of the passenger seats with ease.)
After everything is set up, I start the recording on the audio recorder (and place the power slider in the Hold position), on the three GoPro cameras, and I start the screen recording on the iPad (with SkyDemon running and the route already loaded in) as part of the before start flow. After engine start when the avionics are turned on, I check the audio levels on the display of the audio recorder, and if needed, I adjust the gain setting. After landing and stopping the engine, I stop all 5 recordings.
I use the following settings on the devices, in order to achieve the best quality:
Zoom H1n settings
I record 24 bit audio at a 48 kHz sampling rate, with the input volume dial set typically at 6. No filters are active. 24 bit WAW files provide the highest audio dynamic range, meaning that it is easy to pull up quiet sounds in the recording without too much noise, and the sampling rate is plenty enough for anything really. This is overall the second highest quality achievable with this device, only the sampling rate could be set higher, but that would provide even bigger file sizes without any meaningful benefit for our needs.
GoPro settings
In general I record 4K videos at 30 FPS, as 4K is the typical resolution of television screens, and 30 FPS is fast enough to capture the flights – there is no need for 60 FPS, we are not fighter pilots. I try to keep the ISO low, the colours realistically flat, and I turn off most post-processing features. HyperSmooth (digital image stabilisation) is kept at the highest level that does not crop too much into the field of view yet (so the setting one below the maximum Boost setting), and I use the standard Wide lens (or linear lately if I am filming myself outside of the plane). Superview would give a wider field of view, but I don’t like its unnatural distortion, and in such a wide view you cannot see details as well anymore. A complete list of settings (both general and video profile) can be seen below.
Camera Preferences (on the GoPro HERO 11, for flying during the day):
Controls – Pro
Video Mode – Highest Quality
Voice Control – Off (so you don’t accidentally turn off a recording)
Voice Control Language – English
Wi-fi Band – 5 GHz
Beeps – Medium
LED – Front Off Only (so the reflection of the red LED on the canopy is not visible in the recording)
QuickCapture – Off
Default Preset – Last Used Video
Auto Off – 15 Min (does not really matter on external power)
Screen Saver Rear – 1 Min
Screen Saver Front – Match Rear Screen
Front Screen Options – Full Screen
Auto Lock – Off
LCD Brightness – 40%
Orientation – All
GPS – Off (I don’t use it and it would just use more battery power)
Language – English
Anti-Flicker – 60 Hz (does not matter for flying videos)
Show Max Lens Shortcut – Off
Video Profile (Standard):
Resolution – 4K
Frames Per Second – 30
Lens – Wide
HyperSmooth – On
Duration – No Limit
Scheduled Capture – Off
Timer – Off
10-Bit – On
Bit Rate – High
Shutter – Auto
EV Comp – 0.0
ISO Min – 100
ISO Max – 400
White Balance – Auto
Sharpness – Medium
Color – Flat
Raw Audio – Off
Wind – Auto
Shortcuts – All Off (so you cannot accidentally change settings)
The settings on the HERO 9 and HERO 11 cameras are basically the same, except that on the HERO 11 I have installed the special GoPro Labs firmware, and I have disabled all noise reduction using the !MNR01=1 setting. I prefer this because by default the GoPro HERO 11 uses a relatively strong noise reduction in the less lit parts of the frame even at very low ISO, resulting in murky/blurry regions in some specific situations, which can be avoided by this custom command. This is not an issue with the GoPro HERO 9 cameras, where this overly strong local noise reduction “feature” is not yet present.
For flying at night some settings are a bit different: set the ISO Max to 1600 – you will get a noisier image but at least something will be visible – and set the Shutter to 1/60 second. The problem with leaving the Shutter on Auto is that in the dark it will go for the longest possible 1/30 second (to let in as much light as possible), but the longer the shutter speed the more difficulty the digital image stabilisation will have. During the day the shutter is extremely fast, probably between 1/500 and 1/2000 second, so there is no motion blur in the individual frames, which makes the image stabilisation perform much better. At 1/30 of a second at night, especially close to the ground or with a lot of engine vibrations, all frames will have some motion blur, and the stabilisation will suffer or turn off completely. In general recording at night is much better quality with a modern smartphone or mirrorless/DSLR cameras equipped with optical image stabilisation and/or IBIS, but you either need a passenger who is willing to do all the recording, or a much more sophisticated mounting solution to do this…
Tips for making videos
Recording audio and video material is one thing, creating videos (for public consumption) is another. It took me quite a long time to fine-tune the production flow that I am happy with now, and while I cannot teach you media editing from zero in an already long blog-post (and undoubtedly there are better production quality videos out there than mine with more B-roll footage, or more exciting editing, so in this regard I am maybe not the go-to source), but I can share some tips and tricks. Also, remember that recording cockpit video and audio is primarily a debriefing tool for yourself, and not every recording has to make it to YouTube. Do not put pressure on yourself with any of this, learning from your own mistakes is enough, and publishing your flying on a world-wide platform might not be mentally healthy for you, or useful for others without a lot of editorial work (e.g., I easily spend more than 12 hours spread over multiple days on producing a single video).
With all this said, organisation is key again, just like in the cockpit. I always create a folder for all the media that I recorded during the flight, and within that I will have subfolders for each recording device: 3 GoPro subfolders, an iPad subfolder, and an Audio subfolder. You will need a lot of disk space too, as 4 hours of flying produces 500 GB of media. After each flight I download and organise all recordings first. This is done using a card reader for the GoPro cameras and the audio recorder, and typically by moving files via Google Drive for the screen recordings of the iPad.
The next step is loading all media into your editing software. I use the free DaVinci Resolve. While you can find plenty of videos on YouTube about this software (ranging from introductory to advanced topics), here are a few tips: after dragging in all the files (ordered by creation date, and placing files from different devices onto different media channels) to your timeline, select them channel-by-channel and convert them into single compound clips – one per media channel (so one per device). This will make working with the channels much easier, as at the end you will have just one compound clip for each device/channel. (If one to-be-published video contains multiple legs of flying, and the recordings were stopped between these legs, then I work leg-by-leg first, and merge these only at the very end, so of course then you should have one compound clip per device per flight leg at this point.)
When everything is on your timeline, you will want to sync up the various channels. (Note: you will have as many video channels as GoPro cameras, plus the iPad screen recording, while on top of all the audio channels of the GoPro files and the iPad recording, you will also have an extra audio channel from your audio recorder with the intercom audio). I do this first for the GoPro files, then for the intercom audio file, and finally for the iPad recording. You always want to line up the beginning of the files first (I will explain later why), and that is the easiest by looking at the audio waveforms of the video files, as they contain sharp peak patterns that are easy to align. You can even clap a few times to create these peaks when you start the cameras, then they will be easier to find and align. You can line up the intercom audio by finding the first location where you speak via the headset both in the audio file (this is easy, just look for the first waveforms) and in the now aligned GoPro video files (here it helps if you look straight into a camera and wave or clap again, to make it easier to find). Finally to align the screen recording it is best to start the screen recording when the inside facing GoPro is already running, then you can find the exact position where you started the screen recording on the GoPro footage itself, so you can align the files based on that.
Unfortunately it is not enough to align the beginning of the files, but we have to typically change the playback speed of each channel a little bit, because the internal clock of the recording devices is not exactly the same. In practice this means that after recording for a longer period, the initially synchronised channels begin to shift from each other as time progresses, which can cause voice echos, or voice not being aligned with mouth movement. This correction is typically very very small, I usually encounter values between 99.997% and 100.003%. So how to do this? First of all choose your master channel – this will be your reference channel, you will leave the playback speed of this one on 100%. In my case this is the camera behind my back, the front facing GoPro HERO 11. Then scroll towards the end of the master recording, and find the last visible sharp wavefront peak in its audio channel. Now find the same wavefront peak in the channel that you want to correct; it will be very close-by, typically only a few frames away, since we have already aligned the channels near their starting point. If the peak is slightly later than in the reference channel, then you need to change the playback speed to be a little bit faster, and if it comes a bit earlier than in the reference channel, then you need to slow it down a bit. Experiment with values (starting with very small steps, by applying 100.001% or 99.999% first) and you will see that the peaks start to line up – hopefully – better. Change the playback speed further until they line up exactly. Then repeat this process for all remaining unchanged channels, except for the iPad screen recording (this has very little audio data, and no overlapping audio with the other channels, so being out of sync by fractions of a seconds is not an issue anyway).
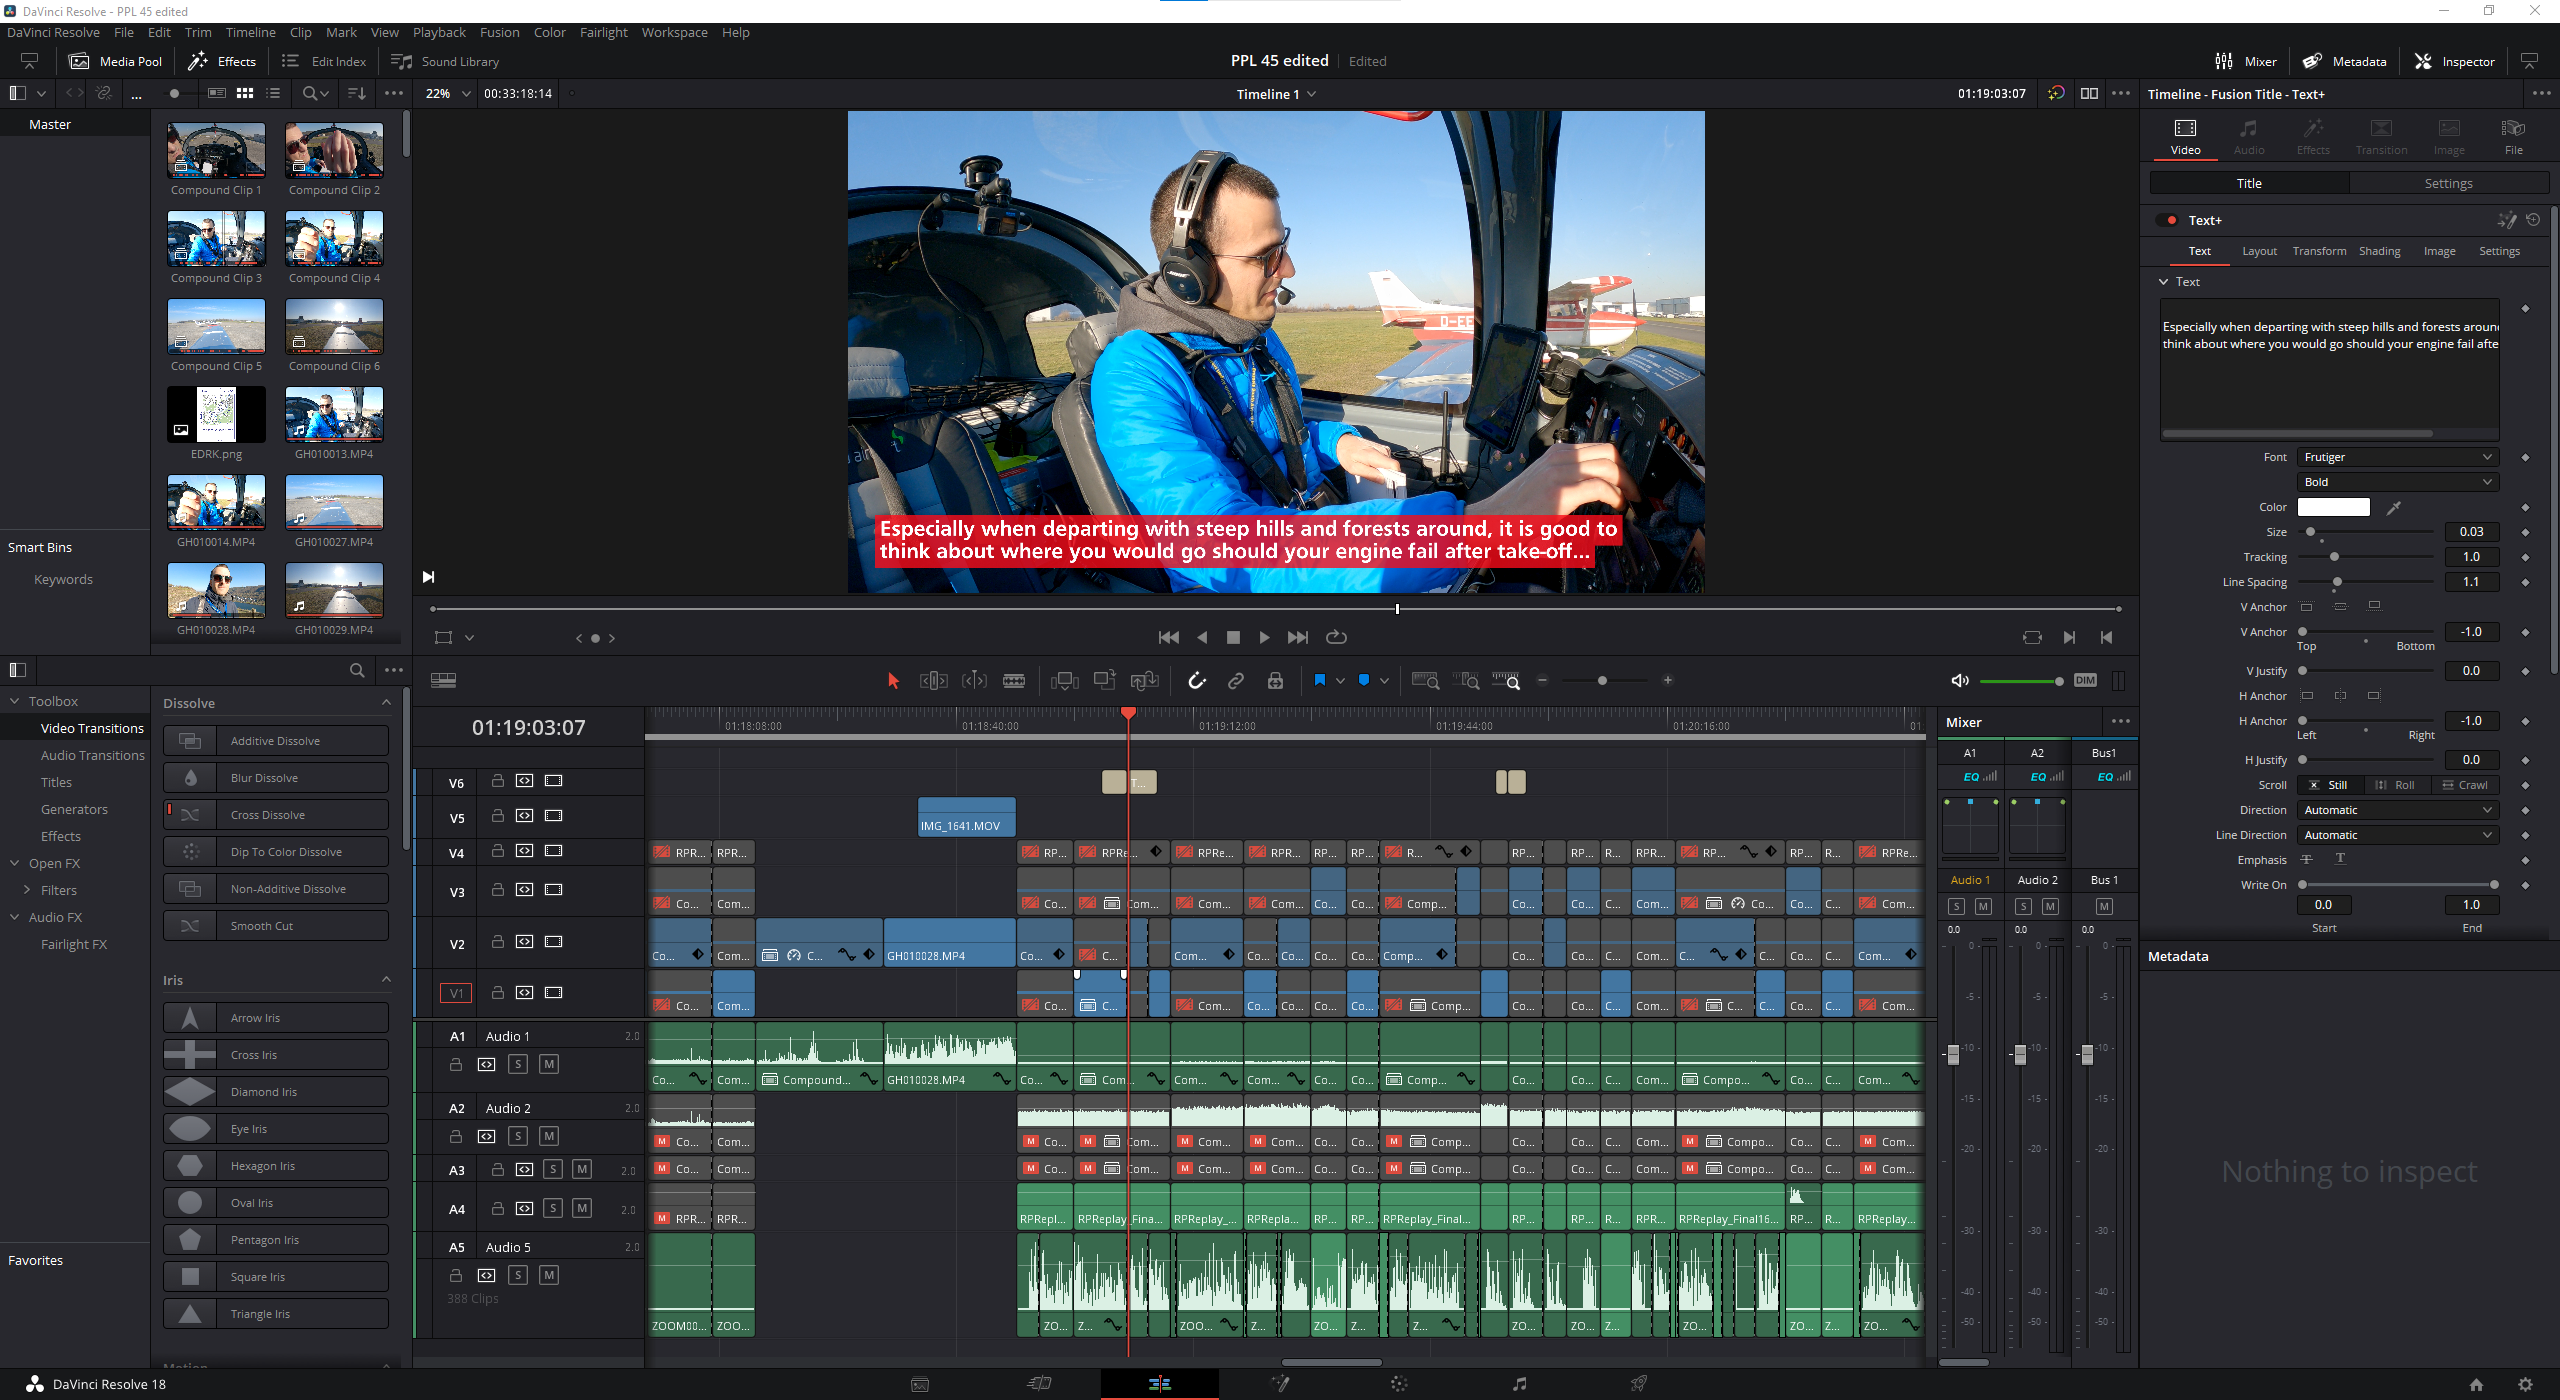
At this point you have all your audio and video channels perfectly synced, and you can start editing your movie (if you want to). Editing basically means finding the parts that you want to keep, and finding the parts that you want to cut out, then selecting which camera angle you want to see in each of the kept segments. It is easiest if you make cuts with the slicing tool all the way through all channels at the beginning and at the end of scenes that you want to include, then you delete the non-wanted parts in between the interesting scenes. Since all your channels are synced up when you start, they will stay synced up during this cutting and deleting process, as long as you always cut through all your channels, and delete scenes including media across all channels. After this switching between your camera angles is simply enabling or disabling the appropriate video channels of the different GoPro cameras within a scene, so at the end always only one video channel is active between consecutive cuts. (Note: never start slicing from the audio-only channel of the audio recorder, as that is not locked to frames, so you could make cuts between frames of your timeline, which is to be avoided for various reasons.)
For the audio, I typically disable all but one GoPro audio channel, and keep the remaining one as background noise pulled down to around -27 dB (which simulates quite well the amount of engine noise that you can still hear in a noise-cancelling headset). My main audio channel is of course the intercom audio. I typically make cuts in this every time a different person transmits or talks, and I normalise all the resulting clips with the normalise audio tool, to make all transmissions and intercom speech sound more or less equally loud. I prefer not to add music to my videos because most often I have barely any scenes without some kind of talking or ATC audio, and I don’t want to make these less understandable by mixing in a music channel. I rather keep the engine sound in the background, as that gives you an audible indication of the power setting changes nicely.
One additional thing that you can do after all the cutting is completed is resetting the playback speed of the now cut scenes of the channels that had their speeds adjusted to other than 100% before. This will remove any potential frame jumps/lags from the final render. As I left the playback speed of my GoPro 11 channel on 100% and adjusted the speed of the GoPro 9 channels to sync up the audio, after all the editing I reset the playback speed of the first GoPro 9 clip to 100% and then I copy-paste the video attributes (Ctr+C, Alt+V, select Retime, and No ripple) to all other GoPro 9 clips.
At the end (after some minor colour grading) I export my videos as high quality mp4 files. I typically end up with at least as many gigabytes as many minutes my video is, but with modern upload speeds this is not an issue anymore. When I am fully satisfied and the video is uploaded to YouTube, then after a few weeks I typically delete all the raw media files, and only keep the rendered video (which saves up hundreds of gigabytes every time).
I hope many people will find all this information somewhat useful in the coming years, before everything I have written here will be rendered obsolete by new gadgets and technology ;)
Fly safe!